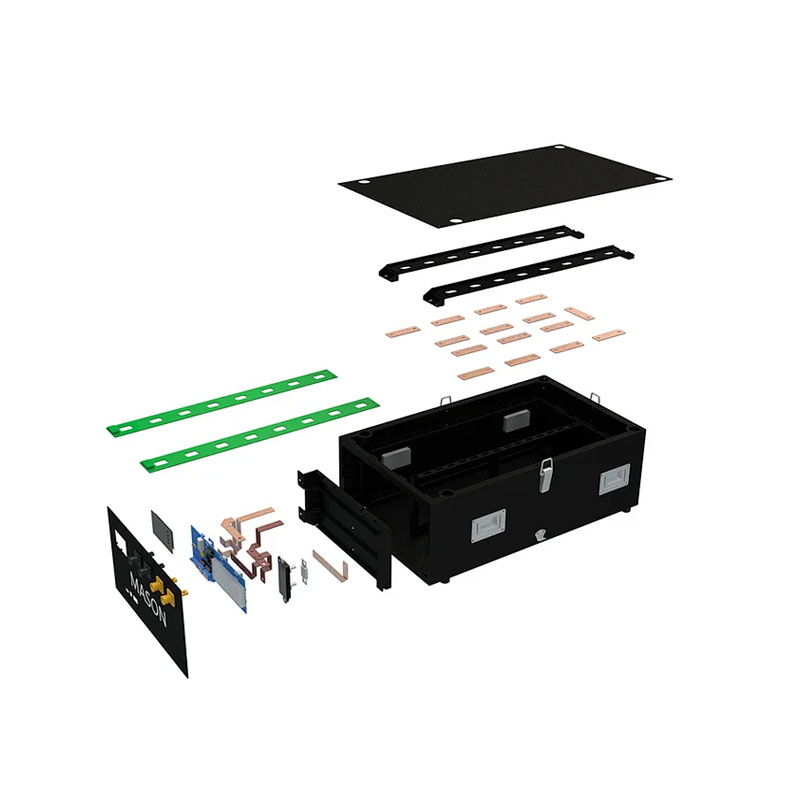
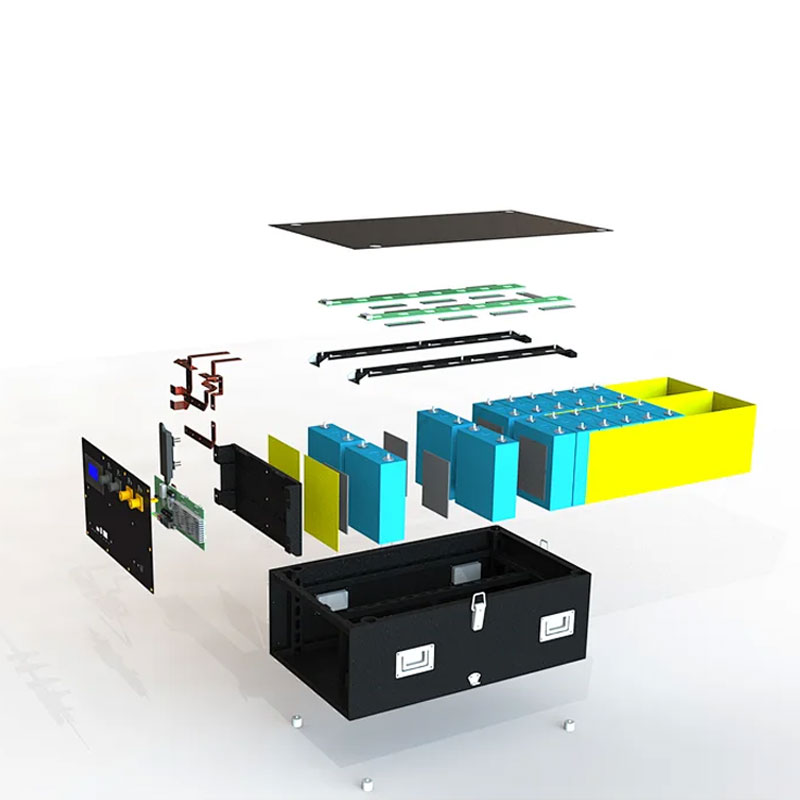
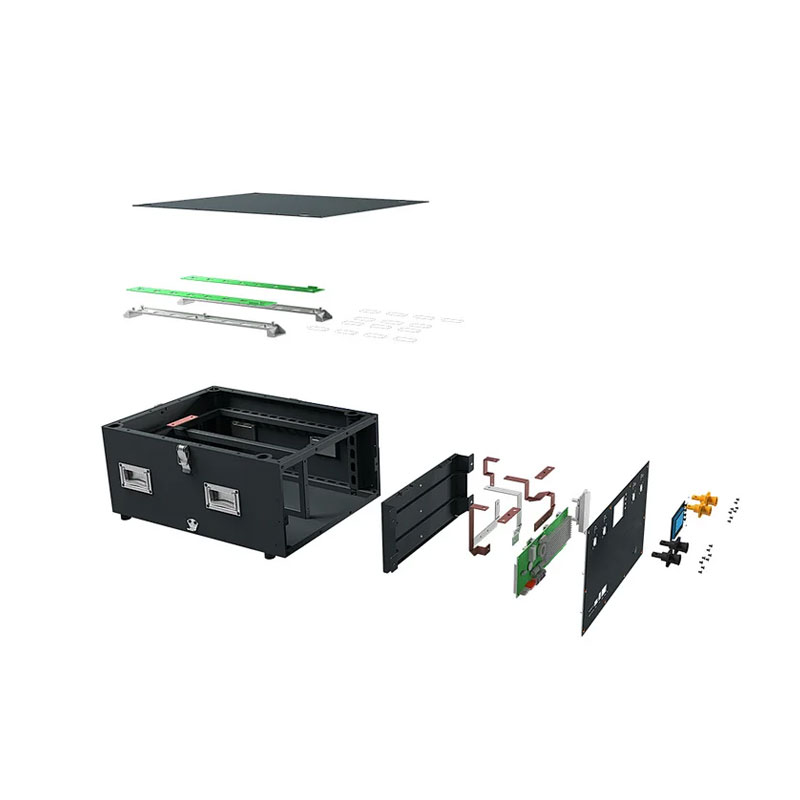
Step 1. Handle and Hasps Installation
Material: 1 battery pack box and 4 concealed handles
Tool: electric screwdriver and hexagonal nuts H2.5
Thread the M4 countersunk nuts with the hex H2.5 to the box sink, with the concealed handles’ folding side facing downward.
Set the torque index of the electric screwdriver to 3 and lock the screws until we hear the sound of “da-da”.
Step 2. EVA Tape A/B/C Installation
Material: epoxy insulation board A/B/C
Rip open the epoxy insulation board A/B/C and stick them to the inner sides of the box
Step 3. Battery Cover Insulation
Material: polycar bonate, box cover
Tool: utility knife
After ripping open the polycarbonate, align it with the box margin and stick them together, and expose the screw holes with a utility knife.
Step 4. Battery Cell Placement
Material: 16 battery cells, 18 EVA-1, 1 fixed plate front, 9 M6 * 14mm Phillip Hex screw Sets(foot fix)
Tool: Phillip screwdriver, screwdriver with torque index option
Put the EVA-1 and cell batteries in the direction shown. After stocking the cells into the box, make sure that side A is slightly lower than the margin or levels with the margin.
Then put another two pieces of EVA-1. Make sure we are having the positive and negative electrodes in the right position.
Set the torque index to 8-9 Nm, and cover the box with a fixed plate front.
Step 5. Top Bracket Insulation
Material: 2×top plate, 8×M5-8mm Phillip hex screw sets
Tools: Phillip screwdriver, screwdriver with torque index option
Rip open the EVA-2, and apply it to the side A of the plate top of the module.
After that, fix the module top plate on the cell batteries with M5*10 screws.
Step 6. Battery Cell Connection
Material: 15×aluminium busbar-1, 12×M4*8mm Phillip hex screw sets, 32×M6 flange nuts
Put the aluminum bus bars as shown. Make sure that we have the maximal contact area between the aluminum bus bar and the cell thread. Put the PCB A/B and tighten it in the order as shown. We lock the string with M6 flange nuts with a torque index of 5 Nm. Connect wire harnesses A and B and measure up the voltage of the module, the neighboring PIN voltage should be around 3.2V.
Step 7. Front plate kits assembling
Material: 2×battery terminals (yellow), 2×battery terminals (black), 1×front plate, 1×BMS, 1×display screen, 10×M3-8mm Phillip round screw sets
1×wire harness C, 1×SF2, 1×SF3, 1×SF5, 1×SF6, 1×SF7, 1×SF8, 1×wire harness A, 1×wire harness B
Fix the battery terminal with a torque index of 1.5-2 Newton meters, BMS with the torque index of 1.5-2 Newton meters, a display screen with a torque index of 0.5-1 Newton meters, a fuse of recommended 7 Newton meters, and copper busbar of torque index of 7 Newton meters. Wrap the display screen wire harness in a cycle and connect the wire harness A, B, and display screen wire harness together.
Step 8. BMS Wiring
Material: 15×aluminium busbar-1, 12×M4*8mm Phillip hex screw sets, 32×M6 flange nuts
Insulate copper busbar S-F-2, S-F-8, and then connect B’s negative electrode with module A wire harness, module B wire harness, and B’s positive electrode, run a turn-on test by turning on the tact switch, and check if the total voltage is 52V and output current is 0.


Step 9. Battery Pack Fix
Material: 15×aluminium busbar-1, 12×M4*8mm Phillip hex screw sets, 32×M6 flange nuts
Lock the box, box cover, and front plate with a torque index of 4 Nm. And we finish assembling the MASON-280 51.2V 280Ah battery pack.
Step 10. BatteryMonitor
If the Battery Monitor system shows that the current isn’t 0, calibrate by login in with the account “admin” and password “admin”.
After assembling, the BMS needs to have capacity learning, and this is how we do it:
Fully charge the battery at a recommended current of 100A
Set it in the battery protection system with a recommended current of 100A
Charge the battery until the battery protection disappears with the recommended current of 100A
The capacity learning is finished.
Please Click for MASON-280 Case kits details.
Previous Back to list Next
 Careful watering can ward off the cold, the heat and the frost
 51.2V104Ah distributed energy storage lights up life along the way to accompany you through the long
 51.2V104Ah-R/S/W Home energy storage lithium battery pack
 Finished kits are available Vertical home energy storage